
Seems as though whenever I prepare my next blog entry, I always end up postponing it's launch to add additional images...I'm worse than NASA! LOL! Thought it would be fun to coincide with the Toy Fair coverage...my own mini toy show - Ha!
Alright, I have a ton of updates to speak of so lets get at it...starting with the Tonnika Sisters.
Below are work in progress images of the sisters with focus on the head sculpts. I have completed sculpting one of them so far. The other will be slightly different, with an identical facial sculpt but altered hair braid. Although the the facial sculpts are identical, I will apply different paint schemes to differentiate between the two. You'll notice one is shorter than the other...this is of course intentional. I plan on retooling the hips and legs for better articulation...not happy with how they work with the sculpt currently.


Hair brading....UGH! Thank you maginfier!!!

HAIR, HAIR WONDEROUS HAIR!!!

Here's one I wasn't planning on working on till much later but some of the talented customizers as of late have inspired me to make my own version of Boba Fett. I'm sure we can all agree that Hasbro just hasn't gotten this guy right. It's always been something wrong with the figues we get, but my biggest gripe has been the "form fitting" helmet Hasbro insists on including with almost every version of Fett for the past several years. I hate that accessory.
So here I go with my interpretation. I will try my best to be movie accurate to the Empire Strike Back costume version...If I can include alternate arms and legs to reflect the minor changes in ROTJ I will do so. Please don't crack down on me if I'm slightly off on a color scheme or the wookie braids aren't long enough...I know there's some major hardcore Fett fans out there and that's cool! I can promise you this...I will be more accurate than any Hasbro version that has come out in this scale. I also want to do a version of Boba from the Dark Empire graphic novel series... oh and of course I will be making a version of Jango as well. No removable helmets, the non-helmet heads will be alternates.
Boba will have the max amount of articlation I can possibly give him but not so much that it will influence the integrity of the sculpt. You can see below that he will have plenty - Ball jointed neck, ball jointed shoulders, ball jointed elbows, swivel forearms, swivel wrists, ball jointed upper torso, swivel waist, ball jointed hips, knees and ankels...WHEW! I think I may be able to get a dynamic pose or two with that kind of articulation don't you? :)

While we are on the subject of Mandalorians, let's revist a piece that has been sitting on my workbench for a couple years now. Finally my Mandalorian Neo Crusader will be completed soon and it has gone through some major changes over the past two years. This guy looks nothing like the original and I'm glad I took my sweet time! This Mandalorian appears in the Knights of the Old Republic comic book series from Dark Horse comics - Flashpoint storyline, issues 7 and 8.


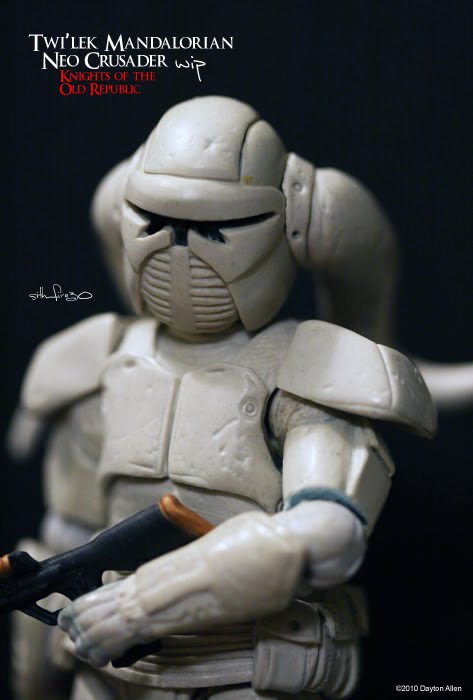

His articulation is a little limited around the hips (not bad) but I may be able to fix that without resculpting anything (oh God - no more rescultping).


He will have two additional "helmeted" headsculpt with alternate lekku positioning. He will also include a "non-helmet" version...which I can use some creative license. Looking forward having some fun with that :)

Alright, lets leave the Star Wars universe for a moment shall we and head for the jungle where our friend Snake is patiently awaiting completion of his sculpt. Unfortunately for him, some major adjustments will need to be made (woah Snake - easy man! Calm down)...

Head sculpt is good to go, torso good to go - arms...stand by...no go! The upper arms are too short and the elbows are to high - the forarms are too long.

Not happy with the hip articluation - would like this figure to crouch and have more dynamic movement. Legs are a bit out of proportion too...no problem though, we can fix them...we have the technology. Snake will have a removable upper torso that will be replaced with a shirtless version - Woohoo! Calm down ladies! I hope to get these adjustments made and completed in the next few weeks so this guy can get painted and out of my hair! The house smells like smoke Snake - easy on the cigs dude!

Alright - back to a galaxy far, far away. More MGS updates coming soon by the way :)
Some more "magnet magic" with Darth Stryfe! I have embeded two magnets in his upper shoulder armor which will allow for a removable "soft goods" cowl! Not sure if you have seen any of the detailing to the removable armor so here's a shot for you which includes the magnet seen in the shoulder area.

Another sith lord in the works - Starkiller as the Sith Stalker (Dark Lord Version) from the video game The Force Unleashed: Ultimate Sith Edition. You've seen the completed helmet - still needs some adjustments..an updated version will be seen later. Rright now I wanted to present some of the upper body sculpt...

The back will have tubing and the respirator box with a clear acrylic window! The figure will have an alternate head sculpt without the helmet. If you are familiar with the game you will have an idea what he looks like behind the mask.

I am currently tooling around with the Tuskin Raider Stalker costume as well - hope to have something to show soon.

Onto yet another Sith Lord - Darth Malgus from the upcoming Bioware game Star Wars: Old Republic. You've seen this dark lord in the "Hope" trailer - he will have alternate damaged body armor and an alternate head featuring the respirator seen in the "Decieved" trailer.


I've placed a TON of detail into the chest armor...happy I was able to keep it a seperate piece.

Below is an updated shot of Malgus's shoulder armor, which is attached with clear bands glued to the inside of the piece while having the arm thread through to the shoulder joint. I think I've mentioned this before but I plan to create two additional Sith Soldiers and two Imperial Troops. Malgus has to have a posse!!!


A quick update to my Savage Opress - almost complete with the head sculpt...just a couple more horns to place, some refinement and he will be complete. I will continue on with the body sculpt, starting with the completion of the upper and lower torso. He will have removable upper body armor and interchagable arms. I will also plan on a battle damaged head sculpt (saber scorched horn damage)!


Finally tonight I am revisiting my ongoing work on an ultimate Darth Vader - this time updating articulation and reworking the helmet. The helmet you see below is the older version - just wanted to show the new updated articulation. The feet come from one of the Halo figures by McFarlane toys. These will of course be "dremeled" down and resculpted. The helmet is going through a complete resculpt...and I'm talkin' complete. I work on one section, mold and cast, then a next phase. So far I've completed the mouth piece, nose and helmet plate. Once the helmet is finalized, I will cast again to begin creating a three piece using the magnets I've spoken of in an earlier entry. I will also be working on a head sculpt of Anakin (Vader).

The articulation is such that the crotch plate piece and cloak will cover the non sculpted hip joints - I wish those not to have any sculpting around them which may prevent the figure to achieve a meditiation position...like when siting in a meditiation chamber...oops! I let it slip!! heehee...
One final thought on Vader - just finished reading the Dark Horse comic - Darth Vader and The Lost Command. The first few panels is of Vader (Anakin) stripped of his armor and prosthetic limbs, receiving upgrades and repair from imperial droids. How cool of a figure would that be!? And you know...when I get an idea in my head...Uh Oh! Look out!

I'd say that's enough to last me till the next update wouldn't you say LOL! Seriously, thank you guys and gals for you continued interest in my work - and to all my facebook fans, you guys rock! We're almost at 300 fans - incredible! Always check my Facebook page, Sith_fire30 Creations and Flickr photostream for additional information and tons of more photos. Comments, suggestions and critique are always welcome!
I'm back to looking at the Toy Fair coverage and wishing that I was there! You all have a great rest of the weekend and a Happy Valentines day!
sith_fire30


