
HAPPY OCTOBER EVERYONE! My favorite month!
It's been an exciting past few months! Thanks to all that attended or attempted to attend (they had to turn people away) the Action Figure Customization Panel at Star Wars Celebration VI in Orlando! It was so exciting to talk about my work alongside two other very talented artists - Sillof and Luke Sprywalker. Together I think we presented a wide range of possibilities that can be achived when creating toys for this hobby.
Special thanks to all that came out to support us! You guys packed the room and are the BEST! Also thanks to Sillof and Luke Sprywalker for having me as part of the team! Finally a shout out to Lucasfilm and those responsible for giving us customizers a chance to present our hobby as a panel event at Star Wars Celebration - we did good guys! Hope to do it again at Celebration VII. By now you've heard all the news from Celebration VI in Orlando so I won't waste your time with what you alredy know - sufice to say it was a wonderful time and many memories made. I'll post some images on my FLICKR account of the event!
Alright, back to work. I've got three months worth of work in progress images to dump on ya so lets get started. This post will mainly be centering in on my ALIEN 1979 project, Prometheus, The Dark Knight series and Blade Runner. Star Wars updates will be kept as a seperate blog posting and will be uploaded soon. I know it's been awhile since I posted any quality Star Wars updates but rest assured they are coming and I think you will be please at what I have in store...plus Celebration VI was an awesome shot in the arm in terms of Star Wars inspiration so I'm off to the races...
First up - ALIEN 1979 project. It's been a year this month since I began this project - I was in hopes to have the entire Nostromo crew completed by now but that hasn't happened. I'm actually close to finishing three characters - Captain Dallas, Ripley and Ash. Finishing up the sculpt work on these three and will soon move on to the rest of the crew as well as the beast itself - Take a look at what I have accomplished so far with this project.

Close to completing Captain Dallas and a couple other crew members of the 79 ALIEN alumni. Dallas' body sculpt is about 90% complete - have to make some adjustments to the length of the jacket - I plan on doing a short sleeved shrit version of the upper torso. Here are some shots of Dallas nearing completion!


While I had some time to work on the sculpt I decided to make adjustments to the already acceptable head sculpt - just made some changes to the thickness of the hair - flattened more off the top. Other than that, same sculpt - may add a mic attachement for a pilot version.

Next up, my progress on Ripley. Per the best of my ability I am striving to give the upmost attention to detail with this 1:18 scale figure line - an example of this would be the detail going into Ripley's flight suit seen below.

Sculpt of the multiple faced digital watch...

This is the alternate head sculpt of Ripley with her hair loosely pinned up while making her escape from the Nostromo. Still may add some hair falling to the side but concerned about how that will cast. May keep it simple for casting and add the extras later.


The incinerator units are castings from the Kubrick ALIEN figure line :) Will add additional tubing and shoulder straps as well as a better paint job.

And here are shots of Ripley using some of my Nostromo wall panels in the background - a work in progress. Plan on adding much more detail to the panels and should have several finalized soon.


Some additional images of Ripley sporting her primary head sculpt. Another accessory you can see in the images is that of Jonsey's cat carrier - a scratch build piece out of sheet styrene. Still a work in progress but will be able to open and close, detailed in and out, will have a handle and include a sculpt of Jones the cat!


When I began working on Ripley I already decided that I would include a "Lucky Star" variant - the term "Lucky Star" describes the version of Ripley when she sings quietly to herself the song "You Are My Lucky Star" while fearfully prepping the airlock to open on the shuttle to rid herself of the Alien stowaway.

This "Lucky Star" variant not only represents Ripley in the white space suit but also includes a version in a near "birthday" suit so to speak - when she strips down to prep for cryo-sleep. This few moments of film made white undies famous! LOL!

While working on this piece, I read where Ridley Scott originally wanted the female characters to be topless when entering the sleep chamber - something about being in limited stasis reacting to clothing or something like that - anyway, the men were shirtless so why not the women right? Well, due to the film ratings and a possible loss of ticket sales in some countries, Ridley decided not to include that version in the film even though it got some camera time.
I had the upper torso close to being completed on my "Lucky Star" variant when I decided to recreate that topless version that was never realized...keeping it tastfull and true to the female form, I sculpted my first nude in the 1:18 scale - it has been years since I have done a nude study at any scale or medium, kinda felt like I was back at school LOL! Below is the only image taken of that version...

...Later I decided to scrap that idea. Mainly it was because of the subject I am working in - basically custom action figures. It wouldn't be apprpriate to have a nude figure presented and with the lack of mature minds that will be seeing the piece, the comments that would be made would only cheapen the work I put into it. So, I scrapped the idea - removing any "anatomically correct" details and continued to sculpt the body, keeping in mind that Sigourney's figure isn't that of a superhero but that of a natural, ordinary female form - nothing outstanding or augmented. Real.

So we have the work in progress of Ripley's body above - a split screen of the same body using the two head variants. The forearms are still needing to be sculpted, the hands are borrowed from existings figures. Still working on the points where the hips and upper thighs meet - still looking a bit wide.

Some additional images of the "Lucky Star" version. These "study shots" are several images I take of the figure in different positions to see the functionality of articulation with respect to the sculpt- in this case, the legs and feet.


Most recent shots of the newly sculpted space undies...yay!


Articulation still exists in the hips even with the thin band going across the waist - but I'm not hard pressed with testing the strength of that thin band. Speaking of which, I plan to thicken the waist just a hair - not much but her waist appears wider in the production shot above. She still needs some work but getting closer...

Finally a shot of Ripley's undershirt - since this image was taken, the shirt was resculpted because of, well to put it frankly - a breast reduction - LOL! I realized adjustments had to be made when I took several more study shots. The new version is much more accurate and will be revealed soon.
I'd say this is a first in 1:18 scale action figure customizing huh? Well, probably not - but such a famous scene of a character becoming her most vulnerable when just a few feet from her lies the enemy in wait...just couldn't pass this up. More to come.
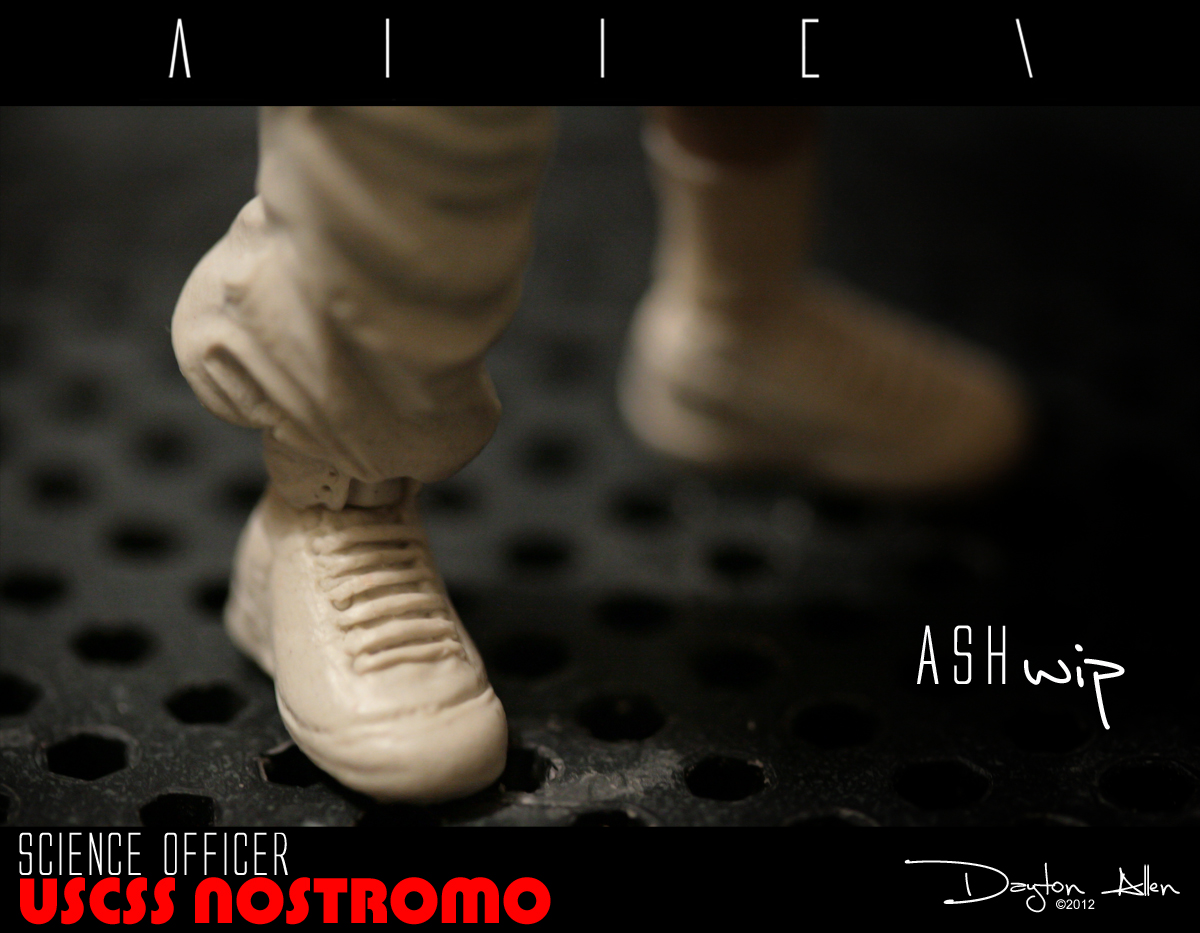
Next up is Ash - and happy to say his primary sculpt is 100% complete! Below are images of the detail that has gone into this characters outfit - the material textures, shoe laces, seam lines, stitches...heavy detail and still completely articulated.


I am currently working on the alternate torso which is called "Robot Discovery" for obvious reasons. Once that torso is complete - I will paint the set.
Below is a cast for an alternate "Ash MILK" version I like to call "My Condolences" featuring Ash's cold, synthetic smile...

...and here is a painted version of Ash's head sculpt for the alternate torso I was talking about earlier. More details on what I have planned for this figure coming soon.

Completed the third and final head sculpt for my Nostromo exploratory team - Lambert joins the party!


Began working on the body sculpt on Lambert's exploratory suit. No much to share except for the image above - she will be shorter that the other two but the suit will remain consistent with the others.
It's been so long since my last update I can't remember if I ever updated you all with my Kane head sculpt for the suits - if not, here ya go....


Not only am I working on the characters to the 1979 motion picture, I am building 1:18 scale sets (dioramas) as well! I have currently been working on the Nostromo's galley but recently began work on the bridge of the Nostromo - starting with the crews pilot seats.

Here is the frame of the pilot seat built from sheet styrene and based on the concept images from Ron Cobb. This frame will have a mold made then several casts will come from it.

The seats upholstery will be sculpted using Aves FIXIT. Once one seat is complete, it will have a mold made and casts to follow. I need to make seven seats like the one you see here in various degrees of condition - some will have ripped and taped upholstery to give it that "lived in" look.

The seats need to go somewhere right? Images of the pilot station for Ash. The frames are made from sheet styrene and will be detailed before having molds and casts made. So basically these are shells at the moment.


Several different pieces that make up this and one other station. The other four stations will come in two larger combos - two stations per unit. One for navigation, the other for communications. The smaller one you see here is the science station.

Here is an image of all the parts broken down. This, in combination with the other stations will make a HUGE diorama of the Nostromo's bridge. Looking forward to building and watching this display grow.

Along with the galley and bridge comes the corridors that connect them all - as well as pressure doors. Images below are the sheet styrene scratch builds of the secondary corridors leading from the galley to the main corridor.


I've completed several panels for the galley - none have been finalized and painted yet. I think of this more of being a long term project - it takes time to sculpt these walls. I will be keeping the display modular which will be able to be broken down and stored when necessary. So far I have one side of the galley display close to completion - haven't started on the other side but I suspect that I will need to gets several pieces laser cut because of detail.

A scratch build of the galley table and chairs! The table will have two additional casted surfaces - one with blood from the chest burster and the other with spilled milk LOL!

Finally the display and custom figures all in various states of progress. Looks rough right now but once all figures have been sculpted/painted and dioramas finalized this will be one handsome show piece!

..and the ALIEN 1979 project rolls on! More updates soon and always on my facebook page! Next - PROMETHEUS.
Don't get me started on about the film - I could spend an entire blog update on my thoughts. Suffice to say it had its good pints and bad - overall though a great, higher end sci-fi flick - nothing that the trailers advertised it would be but I didn't walk out of the theater disappointed..just a bit confused. ANYWAY - enough about that - what i was VERY happy with was the tech, creatures and environments! Basically everything that came out of the art department!
First up is Elizabeth Shaw in Exploratory suit.

I began with a very simple body sculpt over a custom frame. The material the suits are made from have a very distinct texture, not smooth like a wetsuit but fashioned to function like one. The frame was built with various parts from Star Wars and GI Joe figures...especially needed the GI Joe knee joints to be able to create the unique armor and padding that will fit around them. The upper thigh joints came from microman figures.

Next up was fashioning the unique helmet that was designed for this suit. Normally up to this point, I would find existing pieces that were similar - but I couldn't find anything that came close to these domes at 1:18 scale. While I pondered on how I would create the bubble, I quickly sculpted up the chest and collar piece out of super sculpty and had a friend vacuum form a clear bubble dome for me. A process I was unfamiliar with - until now.


While I was sculpting a bubble dome from FIXIT to be vacuum formed, I also began working on the detail to the armor. The images seen here shows the upper and lower arm armor. Additional detailing to these pieces have not been added yet.


Added the padding and armor to the upper leg and knee. The armor is separate from the knee padding allowing the upper and lower knee armor to move independently from one another. The thigh armor also floats above the swivel joint
For the image below I added the foot and thigh armor - still retaining the ankle articulation. Keep in mind this was created about two months before the films release here in the states - I was basing much of my work from reference images off the net. It's only recently that we have been given detailed images of the suits. I think the work at this point was captured pretty accurately with the limited resources I had at the time. Since then I made slight adjustments with the more image resources I have acquired.


Finally completed the vacuum formed bubble for helmet! A number of adjustments since then - the images here show the most recent adjustments, with the final images showing the latest version. I sculpted a blank suggestion of the chest armor and neck collar for the helmet to be taken on and off when needed. Once I had the fitting correct I would begin adding detail as seen in the next several images.


As of last week the last two images above are the most updated work in progress. I am confident once I have the process down for Elizabeth that the remaining characters I wish to create wearing these suits will be much simpler to build. It's always the initial piece where you learn by trial and error on achieving a desired form and function. The rest should be cake...famous last words LOL!
Just began working on the alternate head sculpt of Shaw letting her hair down :)...

...and finally a painted work up of Shaws head sculpt. I will be applying a decal for the name plate on the helmet and YES!!! I TESTED IT AND WORKS PERFECTLY!!!

Also planning to sculpt a "post op" version of Shaw that will come with the Med-Pod and newborn.
Which brings us to the work in progress on David 8 - the robot in the film played by Michael Fassbender. This version will have David in the exploratory suit similar to Shaw's. As always, I begin to work on the head sculpt first...

Sculpted his facial features to show a look of kindness - a later version will have a more focused, determined look. I painted a cast of this earlier in September but was not happy with how it came out so I plan to paint another one soon.

The armor will function exactly like that of Shaw's - but will have an alternate upper torso. The alternate torso will have a "removable head feature" so you can rip David's head and spine out of his body over and over again! YAY! LOL!


Another version of David will be sculpted in his traditional gray suit as seen in the film's beginning. Will come with a basketball and the cryo helmet he wore to communicate with Weyland in cryo-sleep.

Other characters are planned such as Vickers, Janek, Holloway, Fifield and Millburn.
Now onto some aliens from the film...

The Engineers - I was debating wether or not I wanted to begin a sculpt of the creatures wearing their flight suits (space jockeys) or the detailed pressure suits..I think you can guess which version I chose to go with first.


Here is a very early image of the figures frames being built to show the scale comparison between the Engineers and the figure frame for David.
I am sculpting two Engineers - both will have upper torsos held together by magnets so I can switch out with battle damaged versions of the upper body as well a "chest burster" version.


The detailing for these two figures will be INSANE and time consuming. To give you an idea of scale - each figure is 1:18 and will stand at just under 6" tall. Each will be fully articulated.


Did I mention the detailing for these figures to be INSANE?...and I haven't even added the finer details yet. The only negative is the time it's taking to sculpt the work but seriously, it's worth it!


The head is an original sculpt that has been casted a few times. I have an alternate version that you will see further down in the updates. This version will spawn alternates of the Engineer with battle damage and a version of the creature screaming...OH and another version in cryo-sleep wearing the gigeresque mask chock full of detail! Some shots of that further down in the updates...


Some detail of the creatures back - still need to sculpt the legs and arms of each.
Now how about a painted version of the primary head sculpt...


The eyes aren't only a glossy black, there is a variance of gray/white - it just isn't showing up in the photos. I like that it's a slight suggestion - the darkness makes the eyes more foreboding...you know...alien.


I think the paint work on the head sculpt came out very well. The closer you get you will see the slight color additions - it's not just a white coat of paint. You have pinks, reds, blues etc - and veining throughout the aliens skull. I have several more to paint - hope they all turn out this good :)


And here are a couple shots of the second primary head sculpt of the Engineer. I plan on using this head sculpt for the pilot version (space jockey) as well as the decapitated version seen in the film.

Another project I am working on is the cryo-sleep chambers for the Engineers. But before I begin to sculpt the chamber itself, I need to sculpt the mask the Engineer wears to sleep in. Below are images of the sculpt in progress. Much more detail is to be added.


Now for a sculpt I have been wanting to do since the first concept images were released of the film almost two years ago - the Space Jockey helmet.


This sculpt will be based on the pilot helmet with clean lines and smooth textures. The older, weathered artifact will be a variant created from one of these initial casts.


Yes - the helmet is removable and contains the head of the Engineer. The bottom neck piece is attached to the main helmet by a magnet. Again, this will be able to be mounted on a neck ball joint as the Space Jockey. It will also be able to stand on its own as the decapitated artifact seen in the film.

I have several plans for the Engineers - I'm also considering a version of the Space Jockey from the 1979 film - just concerned about the amount of time it will take me once I commit to such a project - I don't know why I should care, its a personal project and not based on any particular timeline. Hmmmmmm - we'll see.
Time to journey into the dark basement....
My final update for Prometheus is the creature seen at the end of the film - a creature that may hold the key to the origin of the egg silo seen in the 1979 film along with the DNA that would ultimately result in "Kane's son".
The "Deacon"


My initial sculpt is based off of hazy screen captures of the beast found on the web and a youtube spoiler clip. It wasn't till the films release that I was able to find better quality references. The sculpt you see here goes through some minor tweaks thanks to the updated information.

Love the above shot of the head - very reminiscent of the xenomorph but more shark like. The shot was actually take horizontally but I felt it was more dramatic being vertical to capture the form of the creatures head.

Gotta remember this thing is a newborn!!!! One of the things that creeped me out the most about this creature was the introduction of human teeth and gums - WOW! Many never noticed it straight away but it makes sense with the creature sharing part human and engineer DNA.
I was only going to make two versions of the Deacon's head - one docile and the other as the "Clown Shark" variant. I then found a screen capture of the Deacon just before the inner mouth was exposed - and it was fantastic! The creature isn't going to expose that inner mouth all the time right? LOL! So along came a second head sculpt variant. I sculpted the mouth so you can actually see the inner mouth just back and to the top of it's throat - similar to that of the second tongue of the xenomorph when it's not in use.
This and the third variant are all built around the initial sculpt just applied to separate castings.


The third variant is done and the set waits for the body sculpt to be completed. Great jumping off point to begin work on more xenomorphs - beginning with the 1979 ALIEN. The inner mouth was a blast to sculpt - Very fleshy and with different teeth than that of the maxilla. I can only imagine what this newborn will look like when full grown!

While I begin work on the body sculpt for the beast I take a moment to paint up one of my castings of the Deacon's docile variant. I want to get the color scheme down before painting the body so practice on some head castings is the way to go. This was what I ended up with - a combination of the pre production images showing the "shark like" gray skin - more dolphin than shark - along with the shadows and fluids secreted from the creatures skin, possibly afterbirth?...gross I know but give the guy a break. LOL! I can imagine this creature in a constant state of molting while growing into an adult - fairly quickly if we all remember our xenomorph biology :)

For the final piece I plan on adding droplets of clear polyurethane to give the creature a slimy, wet look - allowing beads of fluid to drip down the back and off the head.
Onto the body sculpt! I'm using a dremeled down torso of a Hot Toys Snap Kit ALIENS Xeno as the frame, along with several other pieces for the arms, legs and hands.


It was initially very difficult to find many reference images of the Deacon's body but thanks to NECA and several special effects publications, along with the art book from the film, I was able to acquire enough images to get to work.


The creatures body is that of a newborn and does not contain much if any of the biomechanical traits like that of it's predecessors. I honestly don't think as it ages that it will develop much of any. With Kane's newborn we saw signs of the biotech throughout the body - here, not so much.
The head is attached by a ball joint recessed down into the neck. I plan on deepening the recession to hide the ball joint completely.


These final two images above are the most recent updates for the Deacon. I've lowered the ball joint for the head and began work on the hips and upper arms. Again, I'm glad to finally begin work on these types of creatures - the 1979 ALIEN will be a blast to create at this scale! I have some vacuum forming experience under my belt thanks to Shaw's helmet so creating a translucent dome for the ALIEn will not be a difficult one and I've had some practice at sculpting in a "gigeresque" style thanks to the Engineers.
With the announcement of the Prometheus sequel - PARADISE - I can hope for even more creatures and tech to be introduced over the next couple years. The film may have had it's problems...let not fool ourselves...but not when it involves the art behind it which is what has inspired me to work on this project! Much more to come!
Speaking of art, how about we move onto another film whose art has inspired me since I was a child - Blade Runner.
My work on the head sculpt for Roy Batty -Rutger Hauer - is complete. I began working on the body sculpt just the other day.


Not much to show with this update but a assure you the project is moving along, with the frames of Deckard and Zora completed about a week ago. Right now I am in the process of sculpting the heads. Some updates on what to expect of the Roy Batty figure...
Roy will have a removable upper torso which will allow me to replace the trench coat version with one that does not include the coat. The coat will be sculpted on - no softgoods will be used. Roy was more mysterious than a man of action in that coat so I'm not hard pressed for maximum articulation with this version. His legs will be articulated and he will have movement just nothing along the lines of an action hero.
A second version of Roy will be the "Tears in Rain" variant.

Deckard will have two separate torsos, one with his coat and the other without.


Zora's first version will be the "Snake Charmer". I like the chase costume and it will be made for sure but I have always wanted a figure of her with all that glitter LOL!
Much more to come with Blade Runner - especially with the upcoming sequel in the works.
Finally for my update today are some pieces for The Dark Knight Rises.
I begin first with the Dark Knight himself..1:18 scale.


Batman's armor will be based on the second, more maneuverable and lightweight version that was introduced in the second film. I plan to create the Batman Begins armor down the road.


The body frame for Batman is complete and is in the process of being sculpted on. No switch out torsos or any other gimmicks - it will have a variant head sculpt with battle damage as well as a Bruce Wayne (Christian Bale) sculpt. The cape may be sculpted and cast in a black rubber - I haven't decided yet. May test the process and see how it works out - really not happy how some of the soft good capes turn out at this scale for example Darth Vader.
Next up is my work in progress on 1:18 scale Bane (Tom Hardy).

Some close up shots of sculpt detail for the chest armor/vest. Wanted to make sure I got the point across that the armor was nothing more than thick padding and not metal plates. I think you can tell by looking at the images.

Below is an image that shows the two torsos I have in the works right now - one with Bane shirtless and the other with his utility vest and no sleeves. I originally had a shirtless version sculpted but after seeing the movie I went back and brought down the muscle tone and thickened his mass around the chest and abdomen. This guy is a brawler, not a finely tuned fighter - he doesn't need to be graceful to pummel the heck out of his victims.

A shot of the broken mask accessory Bane will come with - wasn't happy that the plastic for the empty helmet drew up a bit once hollowed out - the mask in the shot looks too narrow. Once the Batman's head sculpt is finalized I will go back and finalize another version and remedy the problem.

Here are some images of the shirtless Bane along with the work in progress of his utility vest version - both are close to completion.


More insane detail added to the overall sculpt but the pants and boots were a HUGE challenge! Seam lines, straps, pockets etc - I think there are over a thousand stitch lines added to this small 1:18 set of legs and boots alone LOL! Happy to say I won't have to sculpt the lower body again! Wish I could say that for the upper body...


Sculpt detail to the back of Bane's utility vest - Hard to believe I will have to sculpt all this a second time for the "final confrontation" version of Bane (coming soon). I plan to add actual string or brown thread to both side of his utility vest instead of sculpting it. I think it will ad a bit of practicality to the piece.


Bane will have two additional upper torsos other than the ones seen here - the "Final Confrontation" version which features a long sleeved Bane in his utility vest and his "Let The Games Begin" version wearing his trench coat.
I will also have a couple more head variants - his battle damaged version seen here as a work in progress below and a version just to find additional expression in the eyes.

So while we all wait to see if Hot Toys will release a 1:6 scale version of the Bat (rumors have it that Hot Toy have decided to cancel production), I plan on making a scratch build in 1:18 scale!
Built from various thicknesses of black sheet styrene along with some sculpted elements, The Bat will feature a working canopy that will house 2 figures, spinning propeller belly blades and retractible landing gear. I would love to introduce LED lights to this piece when ready.
Below are several images of what I have accomplished so far which is mainly the cockpit.


For the air intake, I designed a vector image of the pattern and had it laser cut by John and the crew of TSM Engraving located in Indianapolis - be sure to check them out for all of your laser cutting needs - they did a fantastic job!
http://www.tsmengraving.com/

Alright guys! Have much more to share but no time to share it for now - As far as Star Wars updates - NO FEAR. I am planning on having my Star Wars updates run separately from the other updates. So expect an exclusive Star Wars update coming soon!


Metal Gear fans?....keep you waiting huh. LOL! Seriously - look out for some updates with the next update. If you join my Facebook page you may get those updates much sooner. Very excited about the next several Metal Gear games coming out!
If you want to keep up with daily updates and progress of my work, check out my facebook page - href="http://www.facebook.com/pages/Sith_fire30-Creations/121610277862687">Sith_fire30 Creations
Welcome to all the new fans that have joined my art page since my last update - It's been a crazy ride over the past several months but happy to be back into a rhythm and hope to not keep you waiting so long next time.
Not a fan of my facebook page yet? - You should be! I post many updates to figures not seen here - there's just so much I can post on this blog (which is a ton already), facebook is your best bet on staying up to date with specific characters you find interest in. Visit Sith_fire30 Creations and click "like"!
My FLICKR page is live and will be updated with all the images you see here and more very soon. Visit my Flickr photostream - Please go and check it out - bookmark my FLICKR page and check in often. Updates tonight!
Find Sith_fire30 Creations on twitter @sith_fire30
I'm on Tumblr as Sith_fire30 Works Sith_fire30 Works If you have a Tumblr account - you can follow me here - Sith_fire30 Works
I am on Pinterest! Haven't updated the page in awhile but hope that will change soon.
Questions, suggestions or comments, please feel free to contact me here, my facebook or my e-mail me at sith_fire30@yahoo.com.
Take care guys till next update!
Dayton