
First off I want to get back to working on older pieces that have been tabled for one reason or another. For Harrl (Star Wars: Republic), I think it was my disgust with his modified leg articulation which at the time I felt would work...alas, not so much. I had stability problems and motion limitations. Instead of reworking the articulation, I tabeled the figure for a later date and moved on. That was what...two, three years ago? WOW! So I took him off the shelf and am ready to retool the leg and hip articulation using some of the processes I have learned since "back in the day". Maybe it was a good thing I tabeled him...the modifications now won't be as difficult.
Below are some images of Harrl I took the other night sporting his alternate head sculpt - created using Aves FIXIT sculpt. The fur is a little thick making the head a bit top heavy - I'll be thinning that out around the ears and top of the head.


Lets leave the galaxy far away and into a space where no one can hear you scream...
Onto a very big ALIEN update - Figures and dioramas from the 1979 motion picture.
First beginning with Captian Dallas (Tom Skerritt).

The jacket isn't 100% complete yet but I wanted to begin work on the pants so to make sure I can still get the figure to sit properly. In order to do this I need to first sculpt both upper legs and then the hips - in that order. It's important because this is the costume Dallas wears when sitting in the pilots chair on the Nostromo bridge so I want to be sure I don't have to make any dramatic adjustments along the way with detailed hip or lower jacket sculpt work - which is why the jacket isn't finalized. Plus I need to get Kane's jacket sculpt work caught up with Dallas' before going any further. I'd like to keep them as uniformed as possible while not looking like the exact same costume.
Next up is my early work in progress sculpt of Lambert (Veronica Cartwright).

Hair isn't complete yet - doing a bit in layers. I have the body frame made (not shown) but need to add the magnet hip connection so to switch out the upper torso for a variant sculpt later. May make a couple more versions of her head - Veronica made some of the best expressions of horror in this film.
Next up a quick Ripley update.

Not much added since last update - had my hands full with diorama work as you'll see later but I did manage to complete her collared shirt which is exposed from the opened jumpsuit which will be added next.
Hope to make a push on getting Ripley done soon since she is the main heroine character from the franchise. I need to get working on the alternate head sculpt that will have her hair pinned back.
Next up is an update on Dallas and Kane's Environmental Suits.

Been working on the detailing to the suit arms while bringing Kane's suit up to date. The suit is bulky and very industrial. There is so much detail going through the suits - it's taking longer than I anticipated trying to catpture it. I'm working the FIXIT a little at a time - focusing on the details. Completed the forearms of Dallas and thickened the gloves. Haven't added the hardware to the arm bands yet, nor the lacing around the upper arms, nor the padding that goes to the back of each arm...I've got a long way to go! And to think I have two more suits to do after these two - AAARRRGGGGGG!
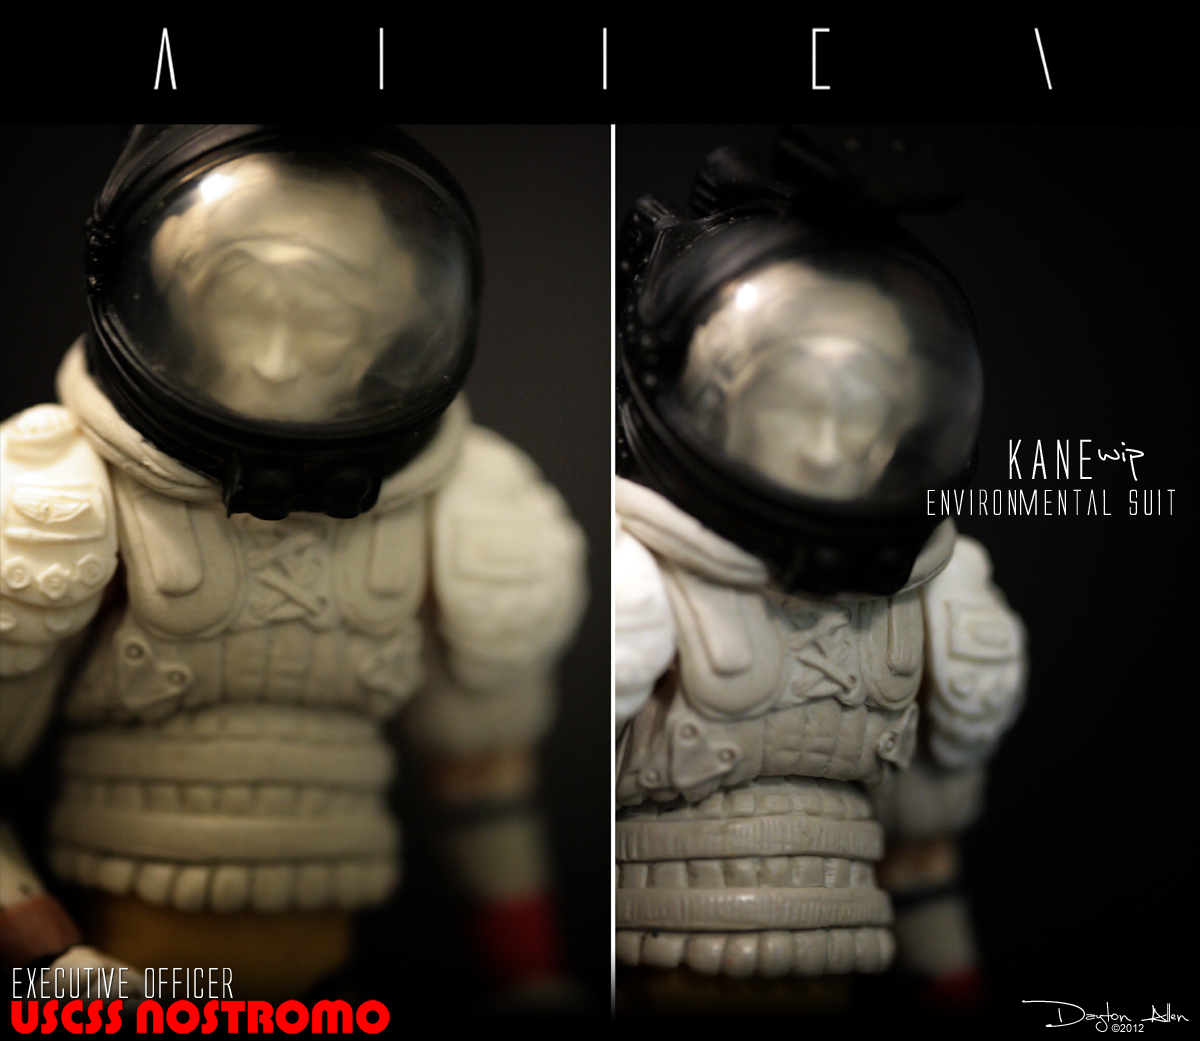
Kane's suit is slowly catching up with Dallas' - Kane's EV head sculpt is slightly larger than that of Dallas' which bothers me just a bit and may require a modification. It's not the head sculpt itself but the leather cap - it may be too thick. This may come in handy when I work on the facehugger helmet but not for a side by side shot - got a long way to go so modifications will be neccessary. I am also not happy with the castings of the shoulder armor so I'm going back and sculpting them over again for Kane's figure...then I'll do it again for Lambert...and finally for Ripley. Just my preference - don't want to put up with air bubbles and the like. I'll still cast each piece for possible copies in the future and if - God forbid- I loose the masters but each suit will have it's own uniquely sculpted armor. May take longer but that's the way it goes sometimes...
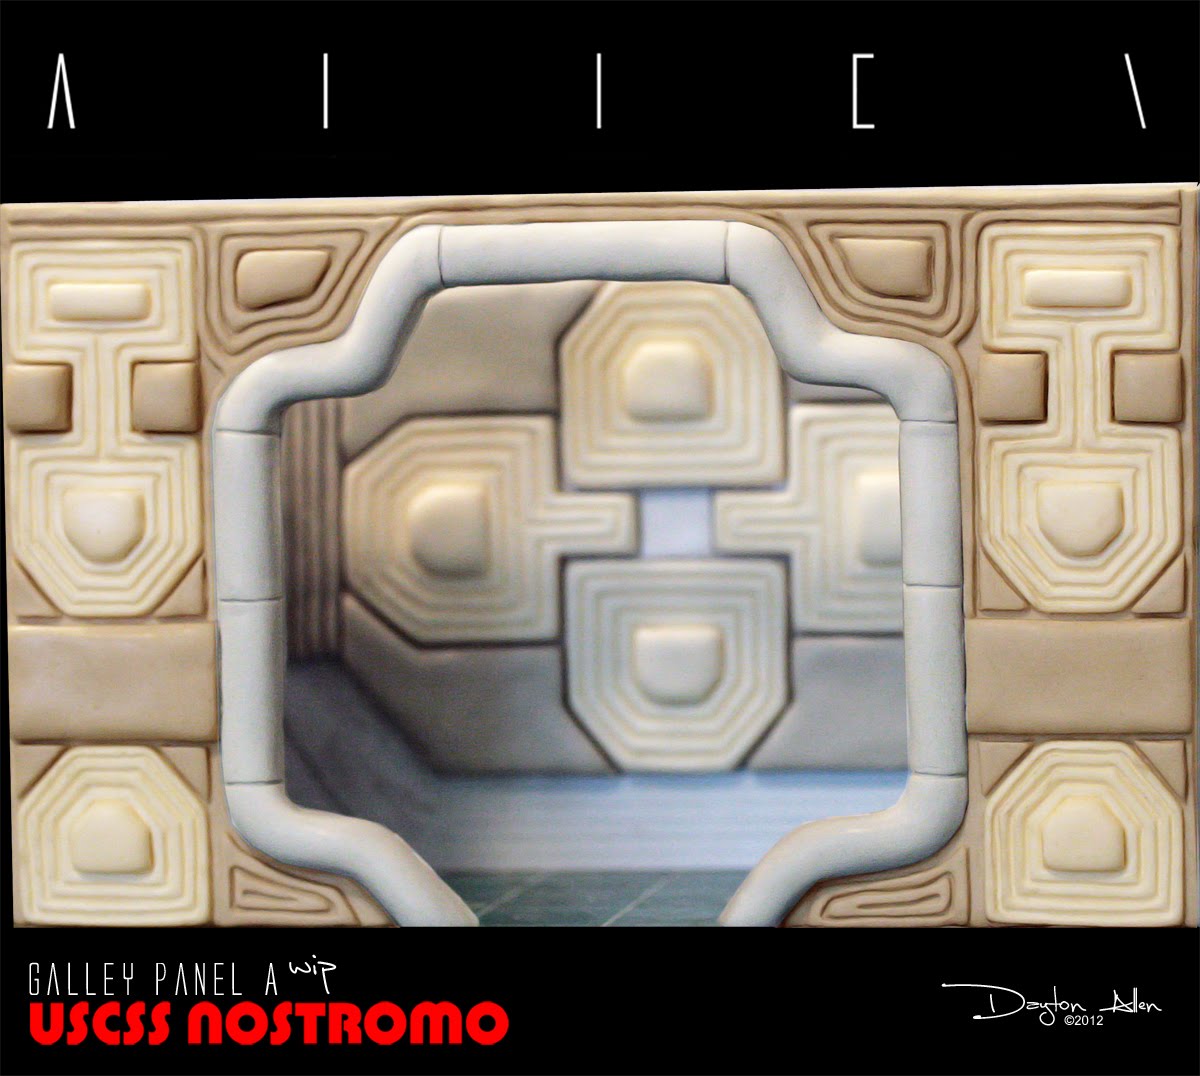
So I am a big fan of dioramas and miniature environments. When I chose to begin working on an ALIEN line of figures, I imagined having an elaborate diorama made to display the completed figures in....nothing in line with actually replicating the sets from the movie...but as I did my research and studied the designs from the film, it inspired me to recreate that part of the film that set a standard for science fiction. Below is the early work in progress of my first panel for the galley of the Nostromo - one of the most unique sets made for any sci-fi film in my opinion.
The casted pieces were originally hand sculpted, then molds made from them. These casted pieces were then glued to the styrene sheet that has been plotted and measured to correct size and proportion - the best I could achieve anyway.

Not only is it a unique set, but it's also the environment where two of the most iconic scenes were filmed - the chestburster and Ash's robot discovery...where movie goers were found fainting in the aisles and puking into the trash cans outside the theater LOL! So making this diorama will be memorable for many fans while at the same time work hand in hand with the figures I am creating. Below is a teaser shot I posted on facebook last week.

And below are the images of the wall panel from the Nostromo Galley - slightly colorized to give a contrast between the walls and the portal entry. The actual pieces have not yet been painted.

You'll notice just behind Dallas is another wall panel I am working on...this will be discussed later in the update.
So I think I'm finished right?...No :( Just realized that I'm missing the inset of the portal door which wraps around to the other side of the wall. I was intending this to be a piece which I can make a one part mold from - still may try to do that but adding the inset and opposite side of the portal would technically make the piece become a two part mold - no big deal but with all the details, I worry about air bubbles. I'd rather have the back open to me in a mold so I can see where the bubbles hide, then once the casts cure, glue them back to back and cover the seams in fixit once again. I will try first with a two part mold but if air bubbles become an issue i will go back to the one piece, open eneded mold.

Image below show the final panel! One of many to come! Inset sculpted and piece ready to be molded!!! Just waiting on the product needed to make the mold - LOL! Isn't that always the way...Once molded, I will make a couple casts and begin working on the other panels to build the room.

The unique, fluid lining was made by applying FIXIT to the styrene piece by piece and outlining the form lightly using a flat chisel shaper. As the FIXIT cures I begin wetting it down and pressing the shaper deeper into the clay to creating the lining. I do this repeatedly while the material cures - each time going a little deeper and adding just a tad more water. Too much water will make the FIXIT begin to "shead" small pieces and become so soft, you loose the form.

Once I achieve the lining, I remove what's left of the water using compresed air and allow it to cure untouched for about an hour. By the time I get to go over the lines again, the FIXIT has cured enough to allow the shaper to flow through the lines smoothly, taking with it any rough edges created by the earlier application.


Below is an image of the back of the panel - showing the interior of the portal that leads to the small corridor. Other than the corridors leading to the Nostromo flight deck and cafetiria, the others are repetitive - so I'm hoping when I make these modular corridors, I will only be concerned with sculpting a single set of parts then molding and casting to make more. I plan on having these corridors connect using magnets...

Some of you may notice that not all the lines are perfectly straight - this is hand sculpted work...and unlike the flight deck, this room can get away with having fluid line and irregular shapes - which adds to the aesthetics of the space...I'm not concerned about the linings not being identical to one another or if one side slightly slopes to the left ot right...in 1:18 scale, I'm happy with how it's turning out :)
Below is the completed panel (one of many) that will be created for both the sleep chamber and the ships deck portals. Remember the scene where Ripley tries to escape to the shuttle and the Alien is waiting for her? The strobe lights are flickering on and off and you see Ripley back against the wall and move away slowly around the corner...this is the wall.


Hand sculpted as before, using the same process. The panel will be molded and cast multiple times as needed. I will add the addtional components seperately to each of the panels (hoses and wires) I create. I will also take a casting and modify it to create the entranceways to other corridors...which will all lead to the Galley.


Here we have a couple images taken of my open ended mold - before I made the inset for the entraceway and added a back ot the piece. Also included in the image is the successfull cast - no air bubbles anywhere! Very easy when you can see what your pouring.

So my plans are to create the Nostromo's galley, cafetieria station, Flight Deck, Mother, Medical Bay and Sleep Chamber - along with all the corridors and pressure doos that go with it....Suffice to say this will be one of those long term projects but the final outcome will be worth it :)
Lets get back down to Earth and focus on the first figure I will be making from the Christoper Nohlan Dark Knight series...Bane.

Below are the finished images of the completed 1:18 head sculpt! If your looking for the work in progress shots, you will be able to find them on my FLICKR Photostream.


This sculpt was made a little at a time while working on other projects. With as much detail as there is going through the mask, to try to take on too much at once using the FIXIT at this scale would be a loosing battle. The head sculpt is final but still needs some refinement before having a mold made - the tubes need to be cleaned up just a bit and some of the rough areas smoothed out.


Bane's body frame has been created - Will consist of all the basic articulation, with the upper torso being connected to the waist by magnets. This so I will be able to have diffrent variations in the costume - I'll be sculpting a version with Bane wearing his trech coat and another without. Sorry for not having an image of the frame to share but I couldn't find time to shoot it before this blog entry. Be sure to check out my facebook page for additional updated soon.


Many of you were very enthusiastic about me taking this project on! Thanks for the support and suggestions!


So while Bane is getting his body worked on, the next character from the Dark Knight series will be none other than the Dark Knight himself - but I'm torn as to which version I should make first...The "Begins" version or "Dark Knight/Rises" version.
I will possibly have a poll listed on my facebook page later tonight - please be sure to chime in with your vote.
Let's jump into hyperspace and get back to some Star Wars goodness...beginning with my work in progress of Darth Vader: Dark Lord of the Sith.


The classic image of Vader bowing before the Emperor as he steps out of his meditation chamber (a work in progress by the way)...Presently I am working on completing the neck collar for Vader without his helmet. Originally I was going to create one helmet that broke down into several pieces...but that didn't work due to the lack of materials and tech I have at my workbench. I'm sure if I had the tech most toy companies used it would be a breeze but for us customizers, we learn to adapt with what we have on hand. I don't mind it...I'm used to creating multiple variants anyway so bring it on! LOL!

Here's a shot with the full completed helmet. The gloss black applied very smoothly for a hand brush job...I always seem to have a problem with gloss but so far with Vader, no complaints.


Added a few more details to the interior part of the helmet, located just under the dome. Love how the deep gloss of the goggles contrast with the flat black.


I reduced the main chest piece a bit to easily fit over the shoulders - before it was a bit too bulky...still is I think. May actually reduce the chest and shoulders themselves...it's not like you will be able to see it :) Vader just doesn't hang out with his armor off all day right?. I also extended the neck of the helmet.

I am very please with how the helmet has turned out overall - I may make some final adjustments but not much. Hard to believe this is hand sculpted - originally it wasn't! I actually began by modifying a Gentle Giant bust ups piece...but over the many months, adjustment after adjustment, I sat back and realized the entire cast had been overhauled and resculpted! LOL! Been thinking about building a battle damaged version - similar to what's seen in The Force Unleashed...haven't decided yet. Would take a possible resculpt of the torso to go along with it!...and a battle damaged leg...and arm...EGADS! WHAT IS MESSA SAYING!!!


Below is a teaser of the finished Vader/Anakin head sculpt - still a work in progress so can't show the entire image but staying true to the real Darth Vader - Sebastian Shaw!! I'm also trying to complete the seat to the meditation chamber so hopefully both can make the big reveal for the next update! :)


Time to focus on another Star Wars related work in progress - The lovely Satele Shan from Star Wars: The Old Republic.

The image above is the teaser I posted on my facebook page last week...time to reveal a bit more of this work in progress. For those that may not be familiar with who the Jedi Satele is...
Below are the most recent work in progress images showing the building of Satele's costume - currently working on the neck collar and upper body.


I plan on adding longer hair to the strands in front as well as some draped across her forehead like you see in the trailer. I will thin out the neck collar a bit more now that the initial application has cured and I can get an eye on perspective. The details in the costume will be added in layers, one piece at a time.
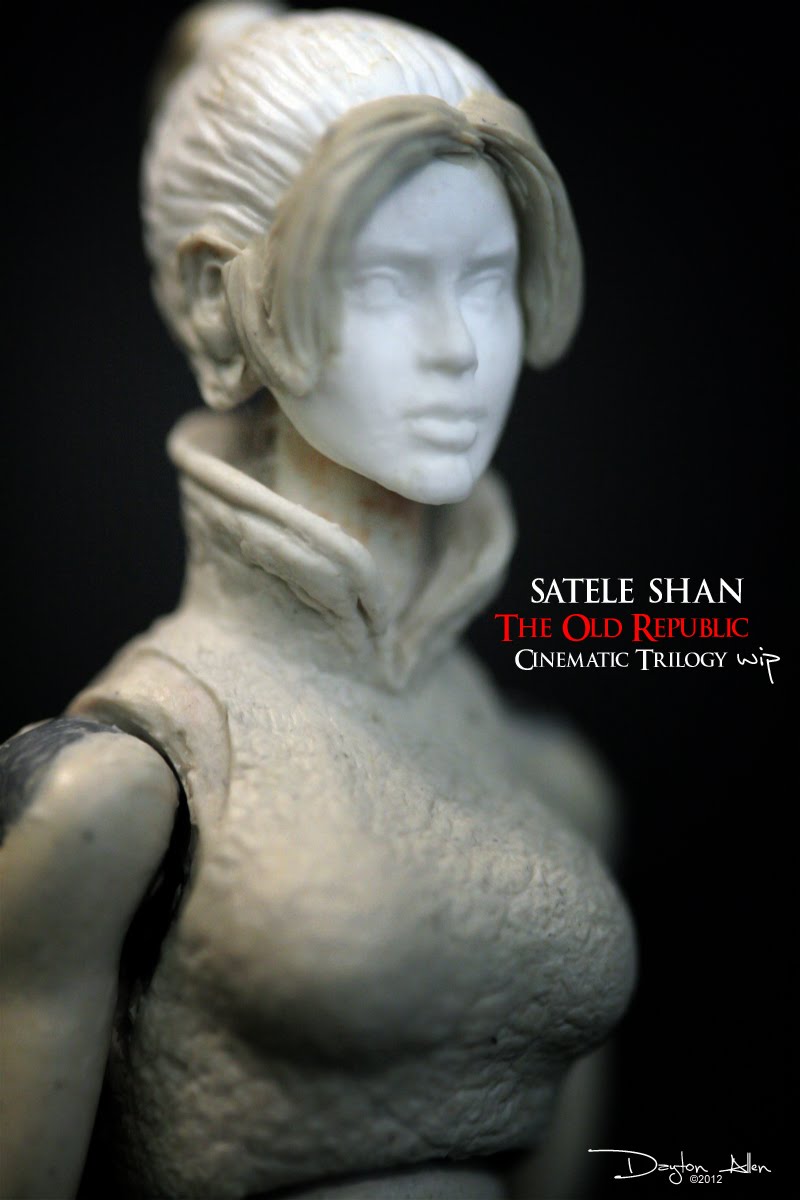

The unpainted head sculpt you see in the images above is the master - the painted sculpt you see below is a cast of the original. The same modifications will apply to the painted piece as well - won't be the first time I've made sculpting modifications to a painted piece.


I initially sculpted and painted several head sculpts of Satele attempting to gain the best, most accurate look for the character in 1:18 scale format with only the trailers as reference. At that time I had no idea the character's likeness was being modeled after the beautiful Sno E. Blac! Be sure to click on the link to her Facebook page!


So what you see in today's blog update is the second version of the sculpt - created in the likeness of Sno, but given the darker paint scheme of Satele. I wanted to be sure I captured the feminine beauty of Sno while at the same time the cold, hard determined warrior of the Jedi master. There was a war going on after all...you're not going to defeat Darth Malgus with just a pretty face..although it doesn't hurt for Bioware to bless Satele with Sno's looks :) What soldier wouldn't want to follow her into battle right? LOL!

I should have the upper body complete by the next update, as well as adjustments to the head sculpt. The lower body will be next - as well as an alternate head sculpt of Satele sporting the pigtails in the "Hope" trailer.

Finally a quick update on what's to be painted this week - like I said at the beginning of this update - I want to bring out some of my older work and finish it - The Twi'lek Mandalorian (inspired by artwork from the Dark Horse comic series, Knights Of The Old Republic) is just about as old as the Harrl work in progress - the difference is I've already brought this Mandalorian up to speed and will begin finalizing him next week - the image shows the two head sculpts that are primed and will be painted by the next update!

Have more big plans for the next update - the initial work on Blade Runner figures, Nightsisters from The Clone Wars, Batman, Alien, Metal Gear, Sucker Punch etc - so much I want to do yet I only have these two arms! But thank God, I love it so!! LOL!
Happy Leap Day by the way! ! Thanks for your continued interest in my work and all the suggestions and comments! I have pleanty of surpises in store so stay tuned!
If you want to keep up with daily updates and progress of my work, check out my facebook page - Sith_fire30 Creations
Greetings to all the new fans that have joined the maddness since the new year began...Thanks so much!
Not a fan yet? - How could you! LOL! Stop by my Faceboook page!! Sith_fire30 Creations and click "like"!
My FLICKR page is live and will be updated with all the images you see here and more very soon. Flickr photostream - Please go and check it out - bookmark my FLICKR page and check in often. Updates tonight!
Sith_fire30 Creations on twitter @sith_fire30
Tumblr as Sith_fire30 Works Sith_fire30 Works If you have a Tumblr account - you can follow me here - Sith_fire30 Works
I am finally on Pinterest!
Questions, suggestions or comments, please feel free to contact me here, my facebook or my e-mail - sith_fire30@yahoo.com. Hope to hear from you! Till next time!
And now, a special announcement from my sponcer...

Sith_fire30