
Hey guys! It's the weekend and I'm out and about writing most of this blog update using my iPhone so please excuse me for any grammatical errors...my expertise in using the thumbpad is limited LOL! :)
So this week marked the release of the Paul S. Kemp novel Star Wars: The Old Republic "Deceived". The story centers around Darth Malgus, the sith lord that sacked Coruscant and laid waste to the Jedi Temple over 3500 years before the rise of Darth Vader. It's a must read if your a fan of the EU or simply curious about events that happened yesrs before that of the Original Trilogy.

To celebrate the novel's release, I thought it would be appropriate to center on my work in progress of the central character - Darth Malgus. I haven't read the novel yet, but I've definately become a fan of the Sith lord, as you can see with my most recent updates below...

The image above represents Malgus before the Battle of Alderran (Hope Trailer). A head sculpt without facial battle armor, cleanly shaven with a face only a Sith witch could love.
Before I get any further let me bring you up to date what has been completed since my last update on Malgus. Both shoulder guards are completed and work properly, using clear bands glued together in loops to the upderside of each guard, then wraping around the arms up to the shoulder joint.
The removable chest armor is completed, still working on the details to his back. I have made a mold/cast of the armor to recreate a battle damaged version.
I have completed both arms, as well as the detailing to the forearm keypads which are very complex. I removed the old hands and upgraded them with hands that are ball jointed and hinged for additional articulation - they are also thicker which compliments the rugged forearm armor.
The lower abdomen is still bare but the legs are finally beginning to take some shape with the upper legs having the first phase of sculpting completed while the boots are beings added.

Above is the second alternate head sculpt - Darth Malgus: Alderran Invasion. This version you've seen before - includes the facial armor or protctiove glove that wraps around his jaws up to the sides of the face...that is until he gets up close and personal with a stingy grenade...

Not once, but TWICE does Malgus take it from close range of an explosive device - it's the second explosion that causes the damage you see in the photo above. Shoulder armor has not been casted yet but once completed it will reflect damage as well. I did this simply by using a 442 Carbon Steel Brush attachement on my dremel and carefully shreading away the areas of the plastic casting that received the damage...and that's exactly what the explosives are designed for...shread. Carefully though, because the metal wire does not forgive, and will cut the plastic cast in half if not careful. It's the first time I used this tool...as well as some others to add pings and pot marks. I think it worked out pretty good.
Not seen in this photo below but added to the facial sculpt is just a bit of the "jaw guard" that remains just below the ear and lower jaw then shreads away. It was completed last night after the photos were taken and will be seen with my next Malgus update.

Now we get to the breathing mask everyone is familiar with - Alternate head sculpt number four!!! Darth Malgus: Sacking of Coruscant. Can't believe this figure has 4 different head sculpts..HA! Thanks to the creators for keeping the Sith Lord's costume consistent or I'd be in BIG TROUBLE!
The early images show the mask in mid sculpt - the latter ones show the completed mask.


The images above show how the mask can tuck down behind the collar guard similar to what we see in the "Decieved" trailer...the below image shows the free range of motion up and around the collar guard. Still though, I think I will be revisiting the collar guard and reduce the size and height - it actually slopes a bit further down on the armor.


Some detail of the forearm tech - did my best to keep each side identical although I'm sure there will be some inconsistencies...no big deal - sculpting is a fluid thing and since I'm not working in a toy factory where I can use a 3D printer...I guess I'm allowed a bit of artistic suggestion.


The image above shows Malgus as he appears at the time of this update - The upper half looks top heavy but will even out once I begin to fill in the blanks below. Happy to say he still retains full articulation as when his frame was first built.

Here are images of the completed mask - still needs some refinement but the sculpt is complete. Added the vents to both sides and the small decorative strips on the main "filter" I guess you would call it.

I cannot wait to paint this guy! All the veins running through his head and the sith fire in his eyes...it's gonna be fun!

Finally to top off my Darth Malgus update for this week...I made some adjustments to a Vintage Sidious hood and will have it as part of the accessories for Malgus when finished...
"...and now...finally...we have returned!" - Darth Malgus.

and if you haven't seen the trailers that feature the Sith Lord - check them out. Below are links...
http://www.swtor.com/media/trailers/hope-cinematic-trailer

Next up - An update on my "non-animated" Savage Opress figure. The image above shows the work in progress on the arms of the shirtless version. The hands are pegged and can be removed and added to the armored version. If you see some irregularities in the abdomen sculpt, that's just the dark imprints of the magnets showing through the very thin layers of FIXIT that cover them...once painted the irregularities will vanish. The waist will remain small so to affix the soft goods and belt and not interfere with hip articulation...

...and here is Savage all armored up and ready to kick the ass of anyone who gets in his way...anyone. Completed the other shoulder guard - still need to complete the forearm armor then I will have the upper body complete.

Uhh...Savage? I think you forgot something when getting dressed this morning?...How about putting some pants on dude?! HA! You'll notice he appears very top heavy at the moment but again, like that of Malgus, everything will even out once the lower body sculpt catches up.
Unfortunately because of the top heavy armor, I will be needing to replace the articulated microman feet with more of a standard ball jointed set. The microman feet simply can't stand the weight and isn't substantial enough to withstand a sculpt over to create the sized boots needed for Savage. Will be replacing them with the feet similar to what I'm using for my Vader sculpt.

Onto the Tonnika Sisters - who are looking more devious every day HA! Head sculpts are complete!! Finished the last one early last week. Working on the body sculpt of each now and will soon begin working on the costumes.


You remeber that I changed the hip articulation to both figures in my last update and in doing so they both ended up the same height. This week I shortened the sister closest to the camera and highten the sculpt of the hips a bit.


I think the adjusted heights of each figure works well, so does the different looks for the hairstyle - keeping each sister a unique piece and not just a carbon copy of one another.

Can't help thinking that they a secretly plotting against me!! HA!

Below is a quick update on my Darth Vader sculpt! Working on shoulder armor right now, thinking of how to attach each piece...possibly similar to what I'm doing with Malgus and Savage.


Detail added to the shoulder armor as seen in the image above. Below, I am needing to extend the chest armor slightly over the shoulders - one side has been completed. Once the other side is done, I will trim both sides back a bit to allow complete arm rotation across the chest...or at least the best to my ability. Some areas of articulation become limited due to the accuracy of the sculpt - I understand that - sometimes it can't be helped....but I hope to keep that from happening here.

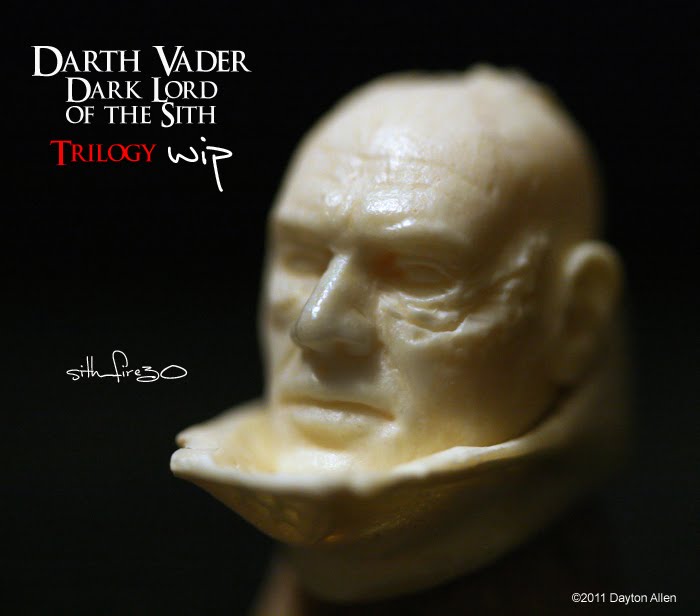
Finally a look into a very rough head sculpt of Darth Vader: Anakin Skywalker - Based on the sculpt Sideshow Collectibles did for their 1:1 Darth Vader bust.
1:1 to 1:18 - talk about a scale down!! The sculpt will be totally seperate from the rest of the helmet armor and will be ball jointed.

Several new sculpts are in the works!!! - Below are TEN new characters that you will be seeing on my workbench in coming updates...

Sith Trooper from Star Wars: The Old Republic - will be making two of them!

Sith Warrior from Star Wars: The Old Republic - also multiples in the works.

Eleena Daru from Star Wars: The Old Republic - Can't have Darth Malgus walking around without his girl right??

Satele Shan also from Star Wars: The Old Republic. Malgus has to have a enemy to pick on every once in awhile.

Captain Juno Eclipse from The Force Unleashed 2

"Maulkiller" from The Force Unleashed 2 DLC.

The ORIGINAL Darth Sion from Knight Of The Old Republic II: The Sith Lords!!

Darth Malak from the DLC of The Force Unleashed 2 Edor pack. Some of you may remeber that I began a Malak sculpt a few years ago but never completed it.

Darth Krayt from the Dark Horse comic series - Star Wars: Legacy - WAR

Darth Wyyrlok from the Dark Horse comic series Star Wars: Legacy - WAR
I'll have many other suprises along the way...including some updates to my Metal Gear Solid series of figures and other non-Star Wars related figures such as hmmmm...

King Leonidas and other characters from 300

Baby Doll from Sucker Punch - regardless what you think about the film (which I found to be a very entertaining fantasy film) you have to agree these gals look sweet with swords and machine guns LOL!

Sweet Pea was my fave in the movie so she would have to be in the lineup.
Sorry for the late post by the way, hoped to get this up earlier but life throws you off center from time to time and well...better late than never!! To my facebook fans, we just broke through 400 in less than a week! For me that is so great words can't describe! Thank you!
Always check my Facebook page, Sith_fire30 Creations and if you haven't become a fan, please click on the "like" button when visiting.
Also be sure to stop by my Flickr photostream for many more photos of Malgus, the sisters and others listed in this update.
Sithfire30 Creations can now be found on twitter!!! @sith_fire30
and if you haven't noticed me posting much, that's because I'm not used to doing so...just give me a bit and I'll work into it.
Will be walking away from the figures I have been working on in this update and get caught up on others that have been warming the workbench. Don't worry though - work will continue for these figures but the updates will focus on others for now. AVOIDING BURNOUT! HA!
Comments, suggestions and critique are always welcome!
Cheers!
sith_fire30


